Wiring a 3 way switch may sound difficult but it is easier than you think when explained step by step. This guide will show you exactly how to wire a 3 way switch using simple instructions, clear diagrams, and beginner friendly tips. Whether you are replacing an old switch or installing a new one, you will learn how each wire connects, what tools you need, and how to avoid common mistakes. We also cover smart switch setups and troubleshooting so you feel confident and safe throughout the process.
Quick Overview — What’s a 3-Way Switch
A 3 way switch allows you to control one light from two different places such as at the top and bottom of a staircase or across a long hallway. It works differently than a regular switch because it uses two switches connected by special wires. This setup gives you more flexibility and comfort in your home. If you are wondering how to wire a 3 way switch this guide will help you understand everything clearly. We will keep it simple with easy instructions helpful diagrams and practical tips that anyone can follow even if you are just starting out.
Interactive Wiring Scenarios Explained
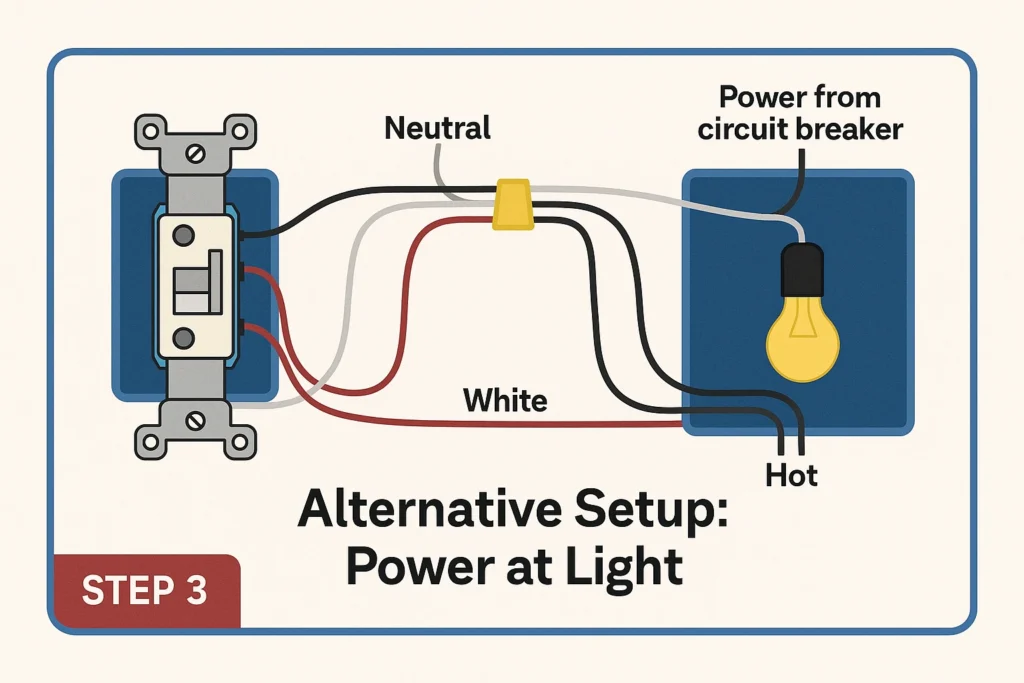
Before you start wiring a 3 way switch it helps to understand the three most common setups. First is when the power comes to the switch box. The second method is when the power reaches the light fixture first before going to the switches. Third is when you want to control multiple lights with the same switches. Each setup uses the same basic idea but the wire connections change slightly. In this guide we will explain each one clearly with simple visuals and tips.
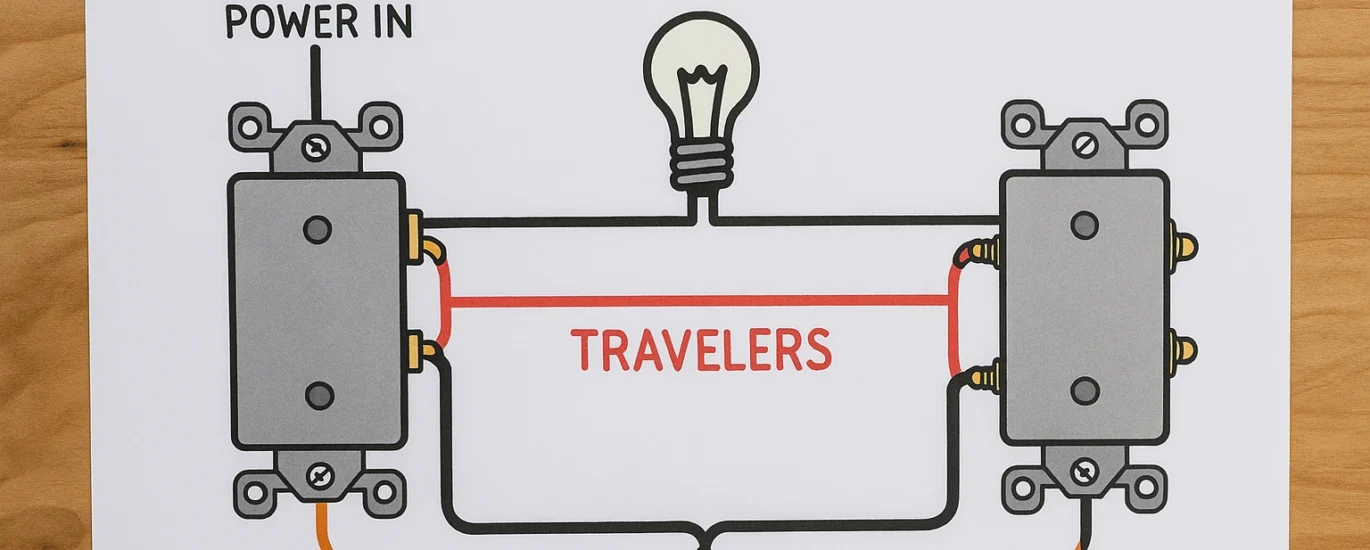
Visual Color-Coded Wire Map
Wiring a 3 way switch becomes much easier when you understand what each wire does. Black wires usually carry the electric current. Red wires connect the two switches and help them work together. White wires send electricity back to complete the circuit, and the bare copper wire is there for safety to prevent shocks. Always check the wire colors in your home as they can vary. Our color-coded diagram will show you exactly where each wire goes so you can connect everything safely and correctly without confusion.
Beginner Setup Kit All You Need
To wire a 3 way switch you need a few basic tools and materials. These include two 3 way switches a screwdriver a wire stripper a voltage tester and 14 3 electrical wire which has black red white and ground wires. You will also need wire nuts and an electrical box. If you are just starting out get a beginner tool kit. Having everything ready before you start makes the job easier and safer for you.
| Item | Purpose |
|---|---|
| 3-way switches (x2) | Allows control from two different locations |
| 14/3 electrical wire | Contains black, red, white, and ground wires |
| Wire nuts | Secures wire connections |
| Voltage tester | Confirms power is off before wiring |
| Screwdriver | Tightens terminals and mounts switches |
| Wire stripper | Removes insulation from wires |
| Electrical box | Holds the switches safely inside the wall |
Step by Step Installation with Diagrams
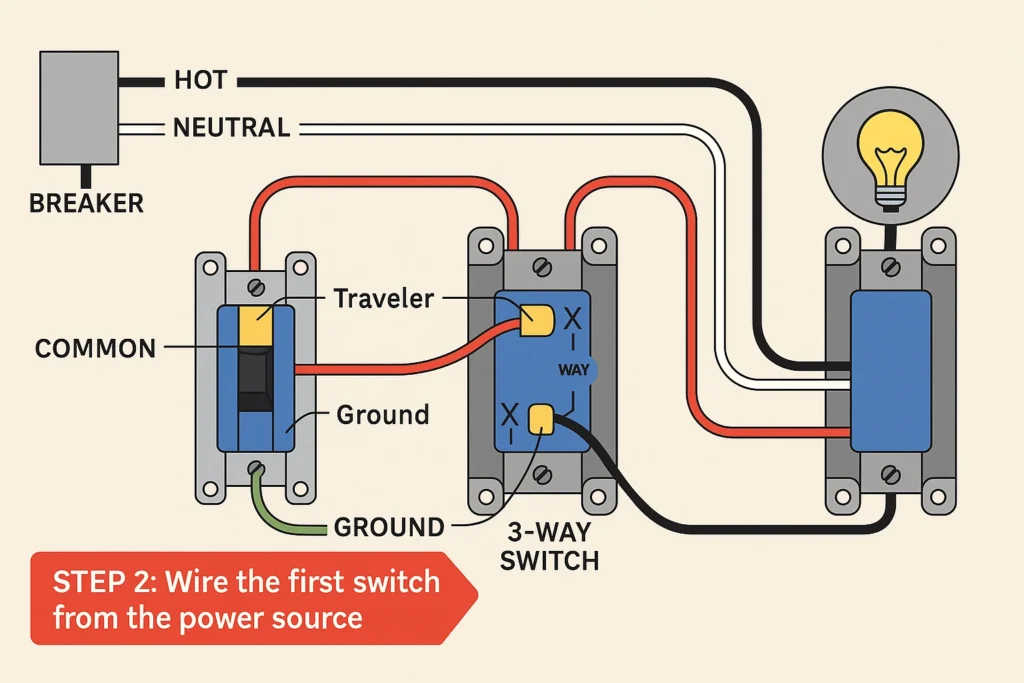
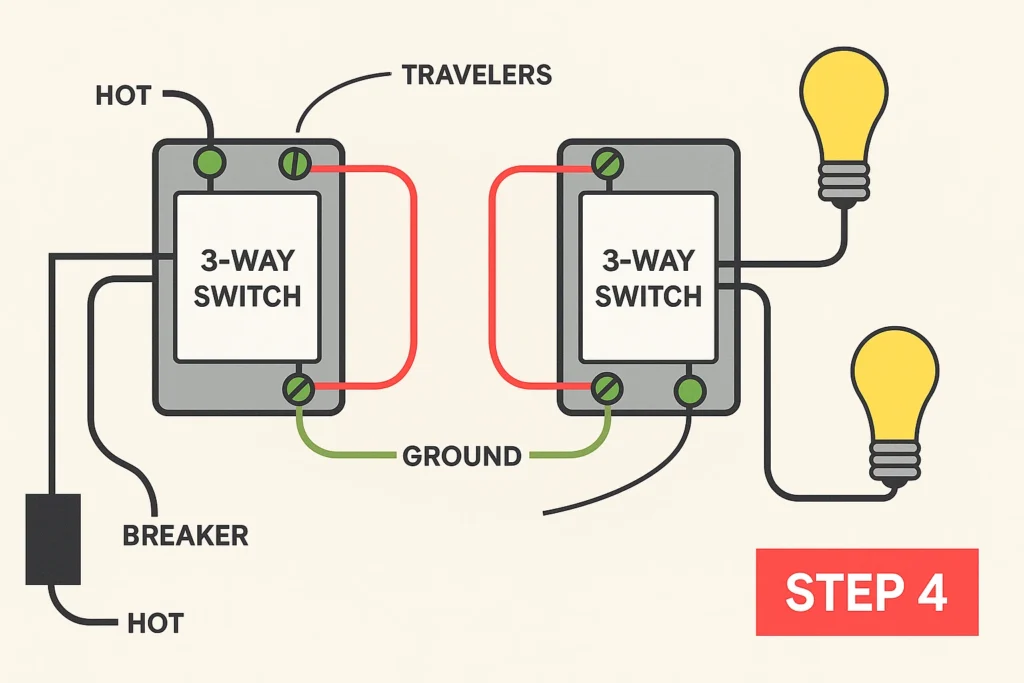
Wiring a 3 way switch may seem tricky at first but following each step makes it simple. Start by turning off the power from the breaker box. Next connect the wires to the right terminals on each switch. The black wire goes to the common screw and the red and black traveler wires go to the other two screws. Use wire nuts for safety and follow the diagram closely. As Per Precautions Take your time and must double check each connection.
| Component | Description |
|---|---|
| Breaker | Supplies power to the circuit through the hot or common wire |
| 3-Way Switch 1 | First switch that connects to traveler wires and common terminal |
| 3-Way Switch 2 | Second switch controlling the light from another location |
| Traveler Wires | Red and black wires connecting the two switches |
| Common Wire | Black wire that carries power from the breaker to the common terminal |
| Ground Wire | Bare copper wire connected to each switch and electrical box for safety |
| Neutral Wire | White wire that completes the circuit back to the panel |
| Light Fixture | Receives power from the switched common wire when the switch is in ON position |
Turn off power before starting
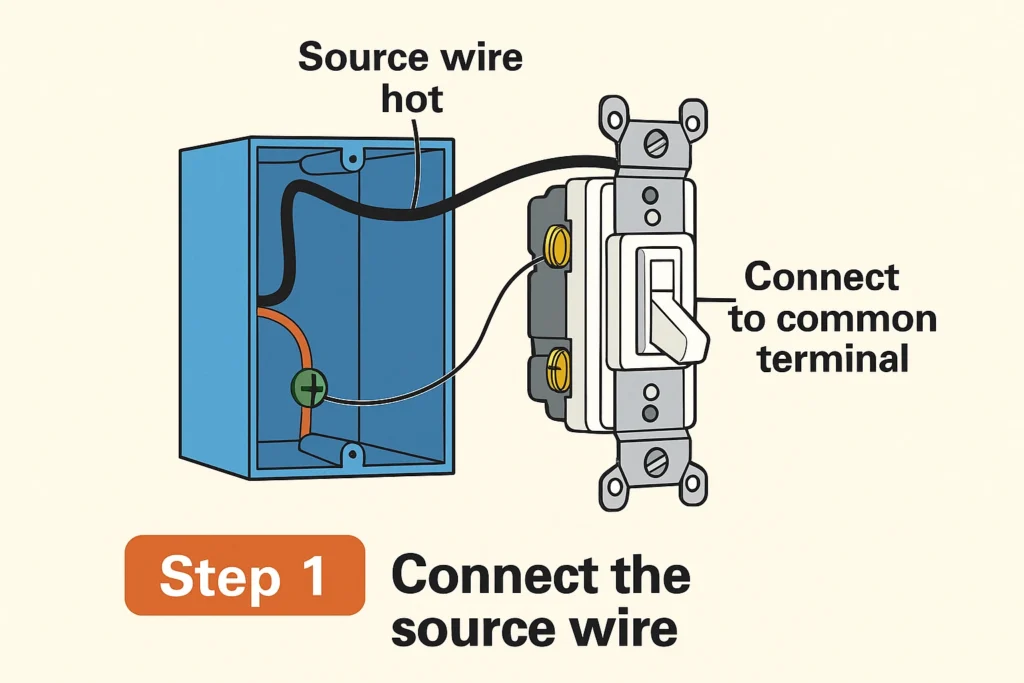
Before touching any wires or switches, always turn off the power at the breaker box. Use a voltage tester to confirm that no electricity is flowing to the circuit you are working on. This step is critical for your safety and helps prevent electrical shocks or damage to your switch. Many DIY mistakes happen when people assume the power is off. Make sure the light controlled by the switch no longer turns on. Turning off the power is the first and most important step in any 3 way switch installation or wiring task, especially for beginners.
Identify the common and traveler terminals
Every 3-way switch has three places to connect wires. One of these is called the common terminal, and it is usually easy to recognize because it has a dark or black screw. This is where the hot wire or load wire connects. The other two screws, usually brass or gold, are the traveler terminals. These connect to the red and black traveler wires that run between the two switches. Correctly identifying these screws is key to getting your wiring right. Always read the switch labeling or instructions to confirm the terminal roles. Confusing the traveler and common terminals is a common mistake in 3 way switch wiring.
Connect the wires correctly on both switches
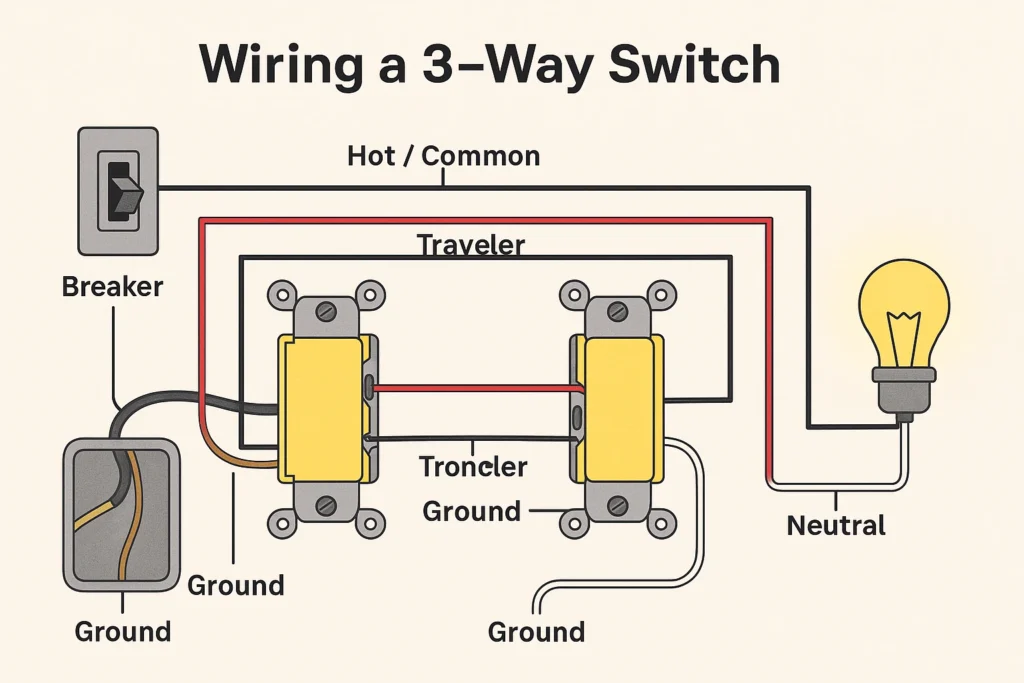
Once you identify the terminals, connect the wires properly. On the first switch, connect the wire that brings power to the screw marked as common. Then, connect the red and black wires to the two other screws — these are the traveler screws. On the second switch, connect the wire that goes to the light to the common screw. Again, connect the red and black wires to the traveler screws just like before. White wires (neutrals) should be joined together with a wire nut and not connected to the switches. Ground wires connect to the green screw. Following this exact wiring setup ensures the 3 way switch works from both locations.
Use wire nuts and ground connections properly
After making all your wire connections, always secure them with wire nuts. Wire nuts keep your connections safe, tight, and prevent any arcing. Give each nut a slight tug to ensure the wires are firmly connected. Also, never skip the ground connection. The bare copper or green wire must be connected to the green ground screw on both switches and also grounded to the metal box if it is grounded itself. Grounding keeps you safe from electric shocks and it’s something the rules actually require in all proper wiring. Taking time to handle wire nuts and ground wires properly helps you avoid shorts, shocks, and future repair issues.
Troubleshooting When the Switch Does Not Work
Sometimes, even after wiring a 3 way switch carefully, the light might not work as expected. You may find that the light only works from one switch or does not turn on at all. This usually means there is a mistake in the wiring such as incorrect traveler connections or a misplaced common wire. In this section, we will go through the most common 3 way switch problems and explain how to test and fix them using a voltage tester. Each issue is easy to solve once you understand where to look. Start by checking the basics listed below.
Light works from one switch only
If your light only turns on or off from one switch, it usually means a wiring issue. The most common cause is that the common wire is connected to the wrong terminal. Double-check the switch with the black screw and ensure it has the correct wire. Also, make sure both traveler wires are connected tightly so they don’t come loose. This problem can also occur if a traveler wire is broken or not making contact. Use a voltage tester to confirm power is reaching both switches. Fixing this mistake will allow your 3-way switch to work correctly from both locations.
Switch clicks but light does not turn on
If you hear a click when using the switch but the light does not respond, the issue could be with the load wire or the light fixture itself. To be sure the bulb isn’t the problem, try it in another light socket to see if it works. Then confirm that the black load wire is properly connected to the common terminal on the second switch. Check for any loose wire nuts or connections that might be interrupting the flow of power. This problem usually happens when someone accidentally connects a traveler wire to the common screw instead of where it’s supposed to go.
Common traveler wiring mistakes to check
One of the most frequent errors in 3-way switch setups is reversing the common wire and traveler wires. If the common wire is placed on one of the brass traveler screws, the switches will not function properly. Another common mistake is using the wrong wire color or assuming wire color always indicates function. Always trace the wire path instead of relying on color. Make sure that the red and black traveler wires are connected to the correct brass terminals and that the common screw is getting either the power source or the load wire, depending on the configuration.
Use a voltage tester for switch diagnosis
A voltage tester is your best tool for identifying where power is or is not flowing in your 3-way switch setup. With the power turned back on briefly, carefully test each terminal to see which wires are live. The common terminal should have power either coming from the source or going to the light. The traveler terminals will have power or not depending on how the switch is flipped. If nothing lights up on your tester, the problem may be at the breaker or in the neutral wire connection. A tester helps locate faults quickly and confirms if the switches are wired correctly.
Smart Home Switches for Modern Setups
You can also use smart switches in a 3 way setup to control your lights with your phone or voice. These smart switches work just like regular ones but connect to Wi Fi and apps like Alexa or Google Home. Some smart switches need a neutral wire so always check before buying. They are great for upgrading your home with modern features while keeping the same wiring layout. Just follow the instructions that come with the device.
Wiring in Old Homes Without Ground or Neutral
If you are working in an old home you might not find a ground or neutral wire in the switch box. This can make wiring a 3 way switch harder. In this case use a voltage tester to identify the live wires. You may need a special switch that works without a neutral wire. Always follow safety rules and consider calling an electrician if you are not sure. Changing out old wiring can help make your home much safer from electrical problems.
Common Myths About 3 Way Switches
Many people believe you need the same color wires for every switch or that only an electrician can install a 3 way switch. These are not true. Wire colors may vary by home and you can safely do the wiring yourself if you follow the steps carefully. Another myth is that you cannot use smart switches in a 3 way setup. You can use them easily if the wiring matches the switch requirements and you follow the guide.
Glossary of Key Wiring Terms
Understanding a few basic terms can make wiring a 3 way switch much easier. The common wire is the main wire that carries power. Traveler wires connect both switches and let the current flow between them. The neutral wire helps the electricity flow back and complete the circuit. It’s usually the white one. The ground wire protects you from electric shock. The load wire sends power to the light. Knowing these terms will help you follow diagrams and connect wires safely and correctly.
| Wire Name | Color | Function |
|---|---|---|
| Common wire | Black | Brings power to or from the switch |
| Traveler wires | Red and black | Carry current between the two switches |
| Neutral wire | White | Completes the circuit back to the panel |
| Ground wire | Bare copper | Safety wire connected to grounding system |
| Load wire | Black | Sends power from switch to light |
FAQs Frequently Asked Questions
Which wires go where on a 3-way switch?
The black or hot wire goes to the common screw (usually black or dark-colored). The red and black traveler wires go to the two brass or gold screws. The ground wire connects to the green screw. Always follow the diagram to avoid mistakes.
What happens if a 3-way switch is wired wrong?
If wired incorrectly, the light may not turn on or may only work from one switch. It can also cause flickering, short circuits, or even a safety hazard. Always double-check your connections before restoring power.
Does it matter where the traveler wires go on a 3-way switch?
No, traveler wires can be swapped between the two traveler screws without affecting how the switch works. However, the common wire must go to the correct screw or the circuit will not function properly.
Which wire goes to the black screw on a 3-way switch?
The black screw is the common terminal, and it always gets the hot wire from the power source or the wire going to the light depending on the configuration. Never connect traveler wires to the black screw.